According to a literature review in the British Medical Journal, it was found that knee pain affected 25% of adults over the age of 55 in a one year period(1). Knee pain can be caused by osteoarthritis, acute sports injury, or overuse. However, most knee pain is a result of two common root causes: muscle imbalance and poor biomechanics, or movement habits.
Even though knee pain is one of the most prevalent sources of orthopedic pain, it is also one of the most preventable by working on the two root causes: muscle balance and improved movement habits in everyday activities like walking or squatting. The goal of this article is to review the ways that muscle imbalance and poor biomechanics can cause knee pain, and review simple, conservative, do-it-yourself exercises to correct the knee pain you are experiencing before going to the orthopedist.
Movements involved in activities of daily living like walking and squatting are two of the most repetitive tasks we do in a typical day. Even if you do not frequent the gym, squatting is something you do each time you rise up from a chair or lower down to a seat. Getting in and out of a low vehicle also is like performing a squat variety. When it comes to movements like walking and squatting, the knee is problematic because it’s the middle joint of the entire lower extremity.
The lower extremity functions as a contiguous movement chain. In the movement chain of the lower extremity, the ankle, knee, and hip all work together to coordinate movements. In squatting and walking, the knee acts like a hinge bridging the gap between the hip and the ankle. The hinge joint of the knee should perform a simple task: to simple bend and straighten. The knee is able to only bend and straighten as it is designed to if the hip and ankle are mobile enough to function properly. Sometimes joint restrictions we acquire in the ankle and hip cause the knee joint to have more motion than it should. In this case, the knee is compensating for poor ankle and hip mobility. So, how do we acquire stiffness in the ankle and hip that can lead to knee pain? Years of repetitive use in sports or even just in sitting and other simple activities of daily living can cause muscle imbalances if there is no stretching and strengthening regimen in place.
These major muscle imbalances can lead to stiffness of the hip and ankle, resulting in overuse of the knee joint. This is then what is considered “repetitive microtrauma” in the knee causing osteoarthritis and other overuse pain syndromes in the knee. It is even possible that the muscle imbalances contribute to acute knee injuries.
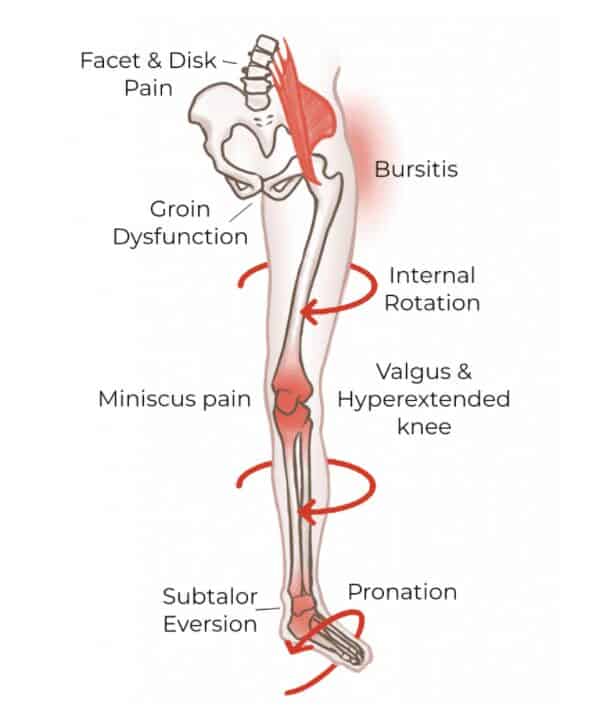
There are very common muscle imbalances causing knee pain. Oftentimes the following patterns of tight muscles versus weak muscles cause pain in the front of the knee, along the middle or outer joint lines, or just achiness through the whole knee. In order to correct the knee problems, it is important to understand which muscles of the entire lower extremity movement chain are tight and weak, respectively. Then, measures can be taken to correct those imbalances.
In the hip, we find the following areas are often tight:
- rectus femoris (the largest quadricep muscle)
- hip capsule
- deep hip rotator
In the hip, we find the following are often weak:
- buttock or gluteal muscles
- hip abductor muscles
- hamstring muscles
- small quadricep muscles
In the foot and ankle, similarly, there are groups of tight versus weak muscles causing misuse of the knee.
The following foot and ankle structures are tight:
- great toe flexors
- calf muscles (called gastrocnemius and soleus)
- plantar fascia
The following muscles are weak:
- foot intrinsics
- posterior tibial muscle
- both of which are major players in arch support
For each of these imbalances, there are targeted exercises to work on the tightness and weakness in order to support the knee joint.
The following exercises provide a conservative, do-it-yourself regimen to help improve your knee pain before seeking invasive medical procedures or surgery. The following exercises could be performed in 15-20 minutes at home with minimal equipment (you may use a tennis ball, baseball, or lacrosse ball if you have one). If the regimen is performed consistently four times a week for six weeks, and no improvement is appreciated, then it would be advised to pursue an evaluation with an orthopedic specialist. The Content is not intended to be a substitute for professional medical advice, diagnosis, or treatment. Always seek the advice of your physician or another qualified health provider with any questions you may have regarding a medical condition.
Quadriceps Stretch
- Lie face down, bend the working knee and place a rolled towel behind it.
- Reach back and grasp the ankle.
- Straighten the knee against your own resistance using gentle force, for 10 seconds.
- Exhale and gently pull your ankle towards your hip.
- Repeat five to ten times over a two minute period
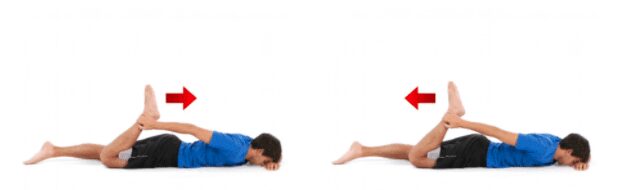
Hip Capsule and Piriformis Stretch – Figure 4
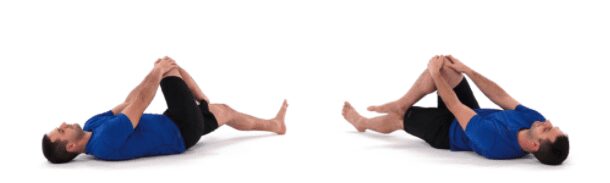
- Lie on your back with the involved leg bent
- Grasp your knee with the opposite hand and pull your thigh inward until a stretch is felt in the buttocks area.
- Hold for two minutes
Great Toe and Plantar Fascia Stretch on Wall
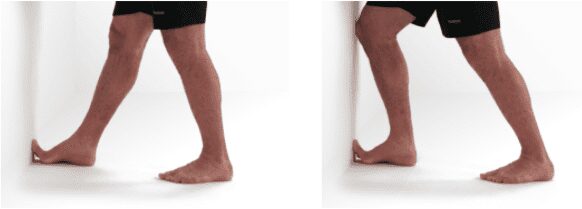
- Stand in front of a wall
- Extend your toes against the wall and try to bring your knee towards the wall until you feel a gentle stretch under the foot
- Maintain the position for 30 seconds, relax slightly, and then resume the deep stretch three to five times
Plantar Fascia Rolling
- Stand next to a chair, wall, or stable object for balance, or you may perform this while seated
- Apply pressure onto a ball gently with one foot while staying grounded on the other foot
- Roll the ball under your foot front-to-back to massage and release the plantar fascia
- Roll for three to five minutes
Calf Stretch
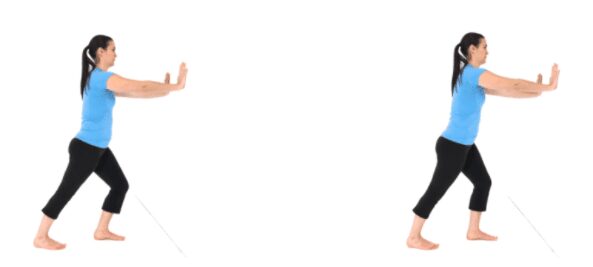
- Put the leg to be stretched behind with the heel on the floor and toes pointing directly forward
- Place both hands on the wall and extend the rear knee while pushing the hips forward without bending the back knee until you feel a stretch in your back calf
- Hold the stretching position for three minutes
Quad Sets
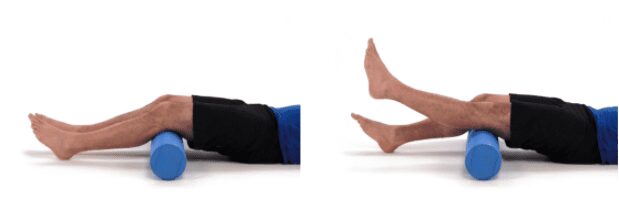
- Lie down on your back with a foam roller or a rolled up towel behind your thigh, just above the knee
- Push your thigh down into the roller and lift your heel up off the floor as high as you can without lifting the leg from the roller
- Lower your leg to the starting position and repeat 10 times
- Complete three sets of 10 with a minute rest between
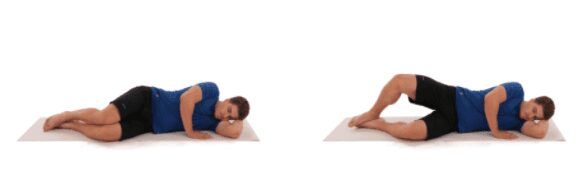
Glute Bridge
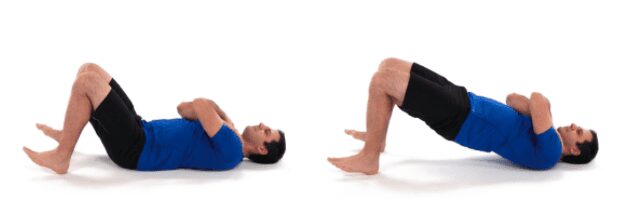
- Lie on your back with your knees bent
- Squeeze your buttocks together and lift them off the ground to make a straight line with your body
- Slowly lower your body and repeat 10 times
- Perform three sets of 10 with one minute of rest between
- Note: Your head, shoulders, and feet are the points of contact on the ground in the high position. You may either have your feet completely on the ground or only your heels so you feel the contraction in your buttocks and not in the hamstrings
Clamshell
- Lie on your side with both legs slightly bent. Lift your top leg (injured leg), keeping your pelvis stable, your leg slightly bent and your heels together
- Open your hip so that your foot and your kneecap are pointing upward during the movement
- You should feel a muscle-burning sensation in your side hip muscles
- Return to the initial position and repeat 10 times.
- Complete three sets of 10 with one minute of rest between
Toe Yoga
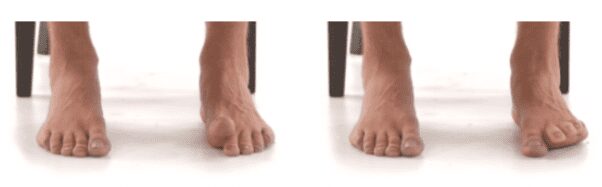
- Sit in a chair with bare feet
- With one foot, lift the big toe up and push the other four toes into the ground
- Next, push your big toe down and lift and splay the other four toes off the ground
- If you are unable to perform the toe lifts you may use your hands to press the resting toes into the ground while you practice lifting the working toes
- Repeat cycle 10 times per foot
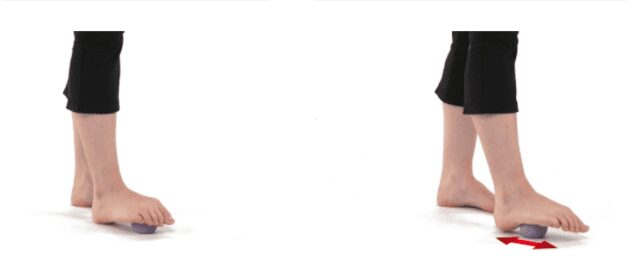
Arch Scoops
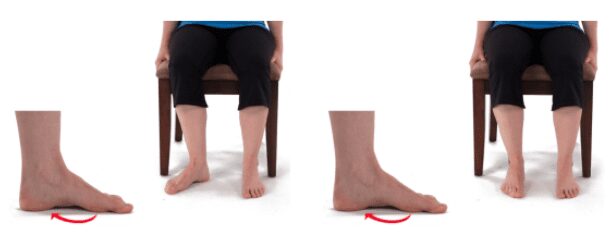
- Sit on the edge of a chair with the feet flat on the ground
- Begin with the affected foot turned out Perform a short foot exercise: increase the height of the arch by actively attempting to approximate the ball of the foot towards the heel, without flexing the toes
- While maintaining the contraction, slide the affected foot across the floor to a neutral position
- Return to start position and repeat the exercise 10 times per side
References:
- https://ard.bmj.com/content/60/2/91
- Rehab instructions and images from Physiotec.ca